Showing posts with label Budget Wows and Woes. Show all posts

Monday, May 21, 2012

A Steak Dinner for Two for $8

Steak is one of our guilty pleasures, but with tight finances we very rarely indulge in its pleasure.  When my mom started talking about their Texas Roadhouse trip my mouth started watering, but the idea of dropping $40 for the two of us was a luxury that we shouldn't allow for.  So we went to "Wallie-World" and bought two semi-nice steaks for about $5.  We added a baked potato  Then we prepared it and had a picnic in the living room.

This is our "go to" when we want a "fancier" steak, a steak that even my mom, the unofficial spokesperson for Heinz 57, enjoys without any of the steak sauce which means that it cuts out those extra calories.

Mushroom and Garlic Smothered Steak and Squish Potato
I had planned on adding a side salad with it, but we used the last of our Bountiful Basket lettuce yesterday for lettuce wraps.  :(

Quick and Dirty Wedge Salad

1 head of Iceberg lettuce "cored" and quartered (1 per person)
Crumbled Feta Cheese
Pecans
Craisins
Cherry Tomatoes
Dress with a Light Raspberry Vinaigrette

The beauty of the wedge salad is its simplicity, you can alter and adjust it easily and its beautiful and makes for a lovely start to a home made delectable meal.

Grilled Seasoned Squish Potato

Wash Potatoes
While moist lay Potatoes on Foil, sprinkle salt, pepper, and garlic powder liberally.
Wrap up the foil.  Toss on the grill and close the grill.  (The skin will most likely have "burn spots" but those are some of my favorite parts hehe.)
Once finished slice the potato once down the middle, taking the ends of the potato in each hand, "Squish" it together.  It will bloom like the picture above.

Mushroom and Garlic Smothered Steak

2 Steaks (about 6-8 oz)
Montreal Seasoning

1 package of mushrooms (sliced)
1/2 a head of garlic, crushed and lightly chopped

Season both with:
Salt
Pepper
Garlic Powder
Onion Powder

The biggest tip we have for making excellent steaks is time, give it time to rest well, rest it often, and time the cook time.  My husband uses the stopwatch app on his phone, he is so meticulous!

As soon as you are about to prep your steak and potato dinner, pull your steaks out of the fridge and season them well.  We like the seasonings above.

Season Your Steaks
Then set it aside and let it rest while you prepare the potatoes and immediately stick them on the grill.  Your potatoes take between 30-45 minutes depending on altitude, size of potatoes, and the heat of your grill.


Then begin on your mushroom and garlic (or other veggie topping) you can top it with anything from caramelized onions to peppers.  Using the flat of your knife crush the garlic and peel it.


Using a tablespoon of butter in a skillet, add the mushrooms and garlic, I cook mine on medium-low to medium.  Again timing is the key here, let the flavors meld together and the mushrooms sweat.  I usually wait until they are about 3/4 the size they were before I let my hubby have the meat for the grill.  When they hit about half the size they were they're done and I usually turn off the heat and let them sit on the warm pan and stove until the steaks are ready.

By this time the potatoes have usually cooked between 10-15 minutes.  Using a little bit of cooking oil on a paper-towel and long handled grill tool grease the grill well.  Set the meat on a high heat hot grill, and use below for timing.

For a 1 inch thick Steak to be medium/medium rare:

2 minutes a quarter turn one way (from noon to three) on the SAME side, and 2 minutes (this will give a lovely cross-hatch to feed the eye.  Flip the steaks and let them cook 6 minutes on the other side.

Subtract 1 minutes from each quarter turn and 2 minutes from the flip (1, 1, 4) for a half inch thick steak.

Obviously, the longer it cooks the more well it will be.

The Meat - I apologize for the poor lighting on it, it was a nice red center with the slightest bit of juices.
To test the meat for done-ness, give it a gentle squeeze with your tongs, the more resistance the more done it is.  (There is reason everyone teased me as a child for liking hockey pucks, well done steaks get stiff!)

Pull off the grill and let it rest for at least 5 minutes, this will time for the juices to soak into the meat, softening it and providing the exquisite texture you get from fine restaurants.

Serve it and enjoy! :)

Let me know if you like cooking yours as much as we do ours!

Wednesday, April 4, 2012

The Key to Good Mission-Style Breakfast Burritos

In looking over our budget food is where we spend a good deal of our money each month.  Most of our budget goes to utilities, mortgage, gas, or debt (yay school loans...yes that is sarcasm.)  What is left goes to food, and in truth we really don't have money for much.  But being a stay at home mom is its own blessing and I wouldn't trade it for all the money in the world.

One of the ways my husband and I have discovered saves us some good bucks is to make him breakfast and lunches.  On average if he eats breakfast and lunch out he can spend $5-10 a day, that's $150-300 a month, $250 is our goal for our entire grocery bill (as of yet we haven't quite made it though we've come close twice.)

Neither of us are morning people - when my daughter wakes up at 7 am I usually spend at least an hour of that day in tears, and that means getting up a half hour to an hour early every morning to make breakfasts and lunches really doesn't help my mental state, and Scottie doesn't relish the idea of adding a good deal more time to cook a nice breakfast either.  So what to do?  Freezer breakfasts!

We have done mission style breakfast burritos many times, and every time we do it we love them all the more.  And I'm prepared to share with you our secrets.

The key to good mission style burritos are well-seasoned hash browns...unless of course you don't like or have hash browns, you like fresh breakfast potatoes, or prefer them baked or fried in oil.  I use shredded frozen hash browns (some of the time) pan-fried with a tiny pat of butter (not really enough to even coat the bottom of the pan) and seasoned with Le's Classic Seasonings: salt, pepper, garlic powder, onion powder (didn't I say last blog I season everything with these?) and a little bit of sage.  Sometimes I'll add a bit of cumin or thyme or rosemary.  I experiment with these and it adds a slight variation, and is fun.  Cook your hash browns and set them aside, and you're on to your next step.

Cook up your hash browns. 

The key to good mission style burritos is good crispy bacon...unless of course you are vegetarian, or are in the mood for sausage, pork, or ham.  I have used it all, today I oven baked my bacon while preparing my other ingredients.  Line a cookie sheet (or something with at least an inch lip to catch the oil) with aluminum foil and lay out your bacon in a flat sheet over the top.  Stick it in the oven and turn your oven on to 425 degrees (don't preheat it!) Set your timer for 24 minutes for crispy bacon, and 20 minutes for chewy bacon.

Pan "bake" bacon.
Be careful when you're removing to not spill the oil, place on a plate with paper-towels and when cool crumble it up.  (If you do sausage make sure to remove any casings!)

Nice Crispy Bacon...Yum!
The key to good mission style burritos is nice sauteed mushrooms...unless of course you like peppers, tomatoes, onions or some other vegetable in your breakfast burritos!  Since these are mostly for my husband and he loves him some mushrooms, I gave them a nice big chop and pan fried them with a smidgen of butter.  Saute up your veggies to soften them up.  Sometimes I add my veggies directly to my eggs and sometimes I sprinkle them on top.

Saute your veggies.

The key to good mission style burritos is cheesy scrambled eggs...unless of course you don't like cheese.  I have done all sorts of things with my eggs, adding veggies, adding cheese, adding chunks of meat.  I always season them with my Le's Classic Seasonings, and sometimes I'll add sage or cumin or Italian seasoning.  (Taste it a few times to make sure you're adding enough!)  Today I used about a quarter lb of swiss and quarter a lb of cheddar cheese.  I mixed half in with my eggs and used half as a "sprinkle."  It is important to get a nice firm set to your eggs because you don't want them to get your tortillas soft.  A good key to getting the right amount of eggs is to double your tortillas and add 1-3 more.  I did 17 eggs and got 8 burritos.

Notice the cheese outside the pan as a sacrifice to the "Good Breakfast Burrito Gods." (My pan was almost too small for 17 eggs! lol.)

The key to good mission style burritos is the medium pork green chili sauce...unless of course you prefer hot or mild, or salsa...verde or regular, or sausage gravy.  Today I didn't have my "standard" pork green chili sauce, I used a simple diced green chili salsa that we enjoy.  If you want to make a quick'n'dirty easy sausage gravy: brown sausage, add a can of cream of mushroom soup, a blurp (less than 1/4 c. but more than a couple T.) of sour cream, and some Le's Classic and sage.  If you're using a green chili sauce you need to make up, follow the directions on the can, if you're just using a salsa you can either add it to your eggs or add it before you fold up the burrito.  I have done both and its good either way.

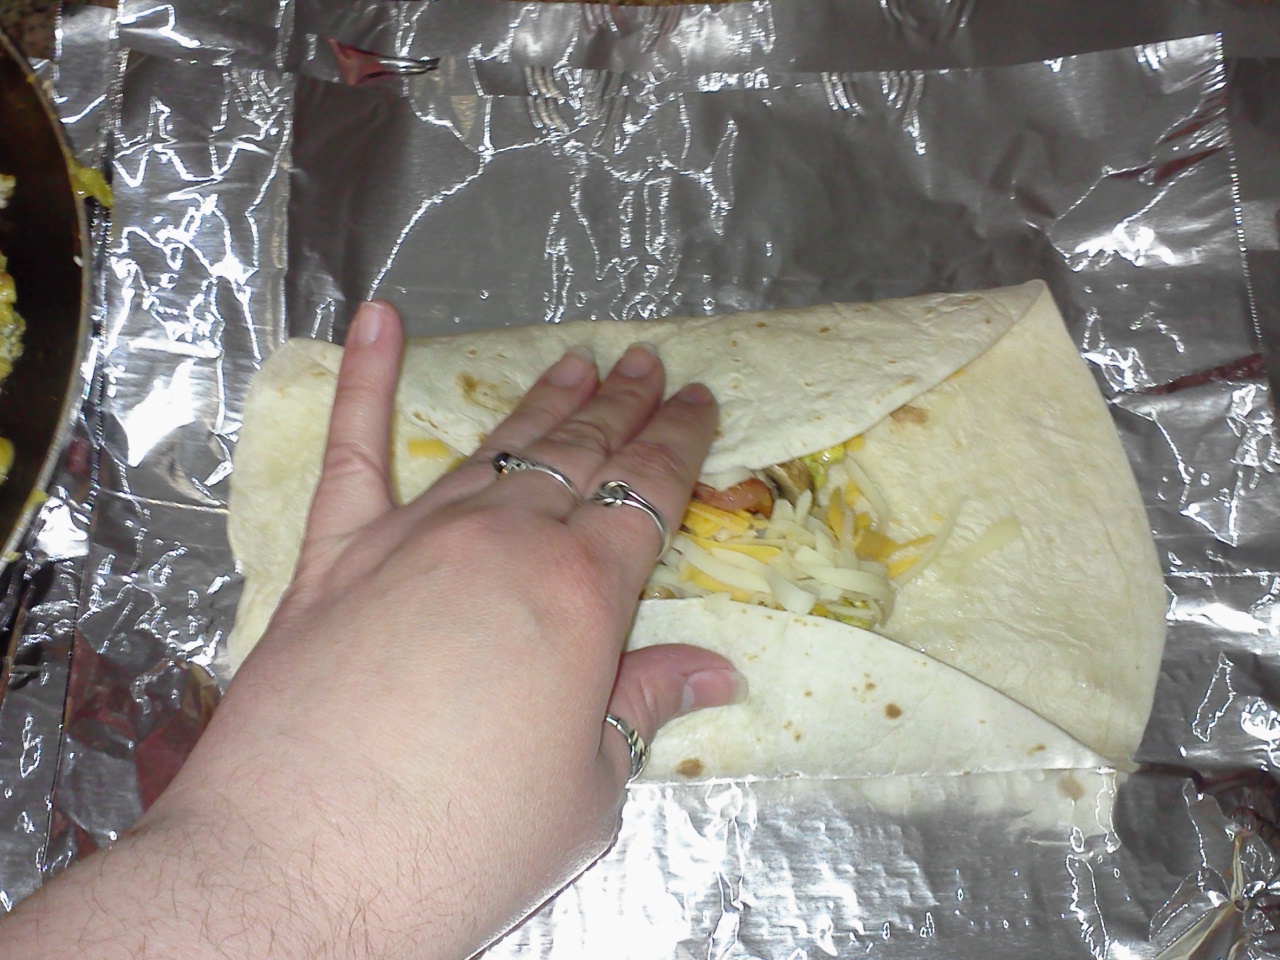
The key to good mission style burritos is the layering...unless you throw it all in with the eggs, which works too.  Today I did my hash browns, then eggs, then veggies, then cheese, then bacon, then green chili salsa.  I will say this, it is important to draw a single line in the center of the tortilla with it.

Notice the line right in the center?  Make sure to leave at least an inch on the top and bottom and 2 inches on each side. 

Tear off several pieces of aluminum foil (one each) and put a tortilla in the center.  Fill it with your layers right down the center, leaving an inch on top and bottom and 2 inches on each side.  Then fold it.

Fold the Top Down and the Bottom Up. 
Fold over one side.
Then roll it over again so you're at the edge of the foil. Then roll the foil the way you rolled up the tortilla. 

Remember to date your burritos and add a quick label (in case you decide to add a different kind before they're all gone).  And stick them in the freezer.  When you're ready to use them you can either stick them in the oven at 350 for about 20 minutes or you can nuke them (without the foil please!) for 3-5 minutes.  Scott says if he's left the frozen burrito on his desk for most of the day and its defrosted some he can cook it faster.

I did get 8 burritos out of this, but I had one to eat with my 2 year old for breakfast hehe.

The Recipe I used today: (Prices are very rough estimates)

1/8 a bag of shredded hashbrowns ($.50)
17 Eggs ($1.50)
1/2 - 1 lb Cheese (1/2 cheddar 1/2 swiss) ($1.25-2.50)
1 lb Zaycon Bacon ($3)
7 Mushrooms ($.75)
1/4 jar of Medium Green Chili Salsa ($.87)
Seasonings ($.15)
8 Tortillas ($2)

Total Spent: Guessing about $10.  ($10.02 adding my guest-imates there) Which means each Breakfast burrito is roughly $1.25 - $1.40.

Today's Mission-Style Breakfast Burritos

The truth is the real key to good Mission-Style Breakfast Burritos is to make them!  They can be done in a huge variety of ways, and adjusted to whatever you and your family likes, and they'll always be tasty, and they'll almost always be around $1 - $1.50 a burrito.  It took me about 45 minutes from start to finish to knock these out, and I fed my husband breakfast while I did them, and it will feed him breakfast 7 more times.    


Monday, April 2, 2012

Budget Lunches - Pint Jar Meals

So I've seen these meals going around called Pint Jar Meals on Pinterest, I'm intrigued because frankly when you wake up in the morning who wants to bag a lunch of the same peanut butter and jam sandwich, and Hot Pockets - while great - get old and still aren't the cheapest option.

So I decided to test some of the Pint Jar Meals on my hubby this weekend.  While I made dinner tonight I "beefed it up" and knocked out 5 jars (enough to get him through the rest of the week).  In truth it really wasn't much more strenuous then making a good meal, and took almost the same amount of time.  If my husband likes them and they heat well / are as convenient as I hope, I'll attempt to make them every Monday.

I made 3 classics: Shepherd's Pie, Spaghetti, and Enchiladas. Which made 5 jars because we ate the spaghetti for dinner tonight.

I started by browning up 2 pounds of meat (roughly 1 for our dinner and roughly 1 for his lunches).  I used Elk and Hamburger because we like the flavor of Elk but I want to stretch it out.  You can use any sort of ground meat you like (turkey, beef, pork, venison, etc.)


I added some "always" seasonings to my meat: salt, pepper, garlic powder and dried onion flakes or onion powder.  It is rare that I'll do a meal without at least a touch of each of these five, they're our Go-Tos, and add flavor without a lot of added bad stuff.  The salt is the only real one you want to watch out for.

I divvied it up into 3 pans - one for each recipe, my spaghetti pan got the majority because that was dinner tonight.

Then I added my sauce and basic seasonings to each pan.

To my spaghetti pan a 6 oz can of Tomato Paste and a jar of home-canned tomatoes. (Or diced tomatoes from a jar is good, too.)  About a tablespoon of brown sugar, a generous shake or two of Italian seasoning, (oregano, basil, rosemary and thyme) usually a bit more salt and a pepper go in my "basic spaghetti" seasonings.


To my shepherd's pie pan a can of cream of mushroom soup, about 2 T of sour cream (more or less to taste) and a blurp (a little less than 1/4 c.) of milk.  For a bit of added flavor add some Worcestershire and some liquid smoke.  Usually I'll add extra garlic powder and onion powder.  I have been known to throw a dusting of sage, thyme, oregano, rosemary, or cumin, but then I like to spice things up differently most of the time depending on my mood - experiment!  


To my enchilada pan a can of medium enchilada sauce, and about half a packet of taco seasoning.  If it isn't "enough" I'll add a few red pepper flakes (Sparingly its spicy!) and cumin.


Mix each of the pans and let the sauce come together a few minutes.  Taste it and see if it needs anything, tweak as needed.


Add your veggies.  Here is where you can get creative, add what you like.  All three can take mushrooms, diced tomatoes, and onions or green onions.  Shepherd's pie can have green beans, enchilada's can have corn, spaghetti I've heard is great with some diced zucchini.  The point is sneak in some veggies when your family or hubby isn't looking.  Since my whole family likes mushrooms, especially Scottie-who these are for, I did a large slice on them and tossed them in with the enchiladas and shepherd's pie (we ran out before I could put them in the spaghetti!)


Let the veggies break down and your sauces come together stirring often.

Do your starch (if it requires doing!) I boiled a thing of water and did my noodles, then while we were eating I boiled my potatoes.


Mash your potatoes (I did 3 small-medium russets and they topped 2 pint jars perfectly).  I like to add another blurp of milk (remember a little less than 1/4 c.) and dollop of sour cream.  Sometimes I'll go the whole nine yards and dice and saute up a few cloves of garlic to go in it.


Do your finishing work then put your jars together.  Remember the sturdier stuff goes on the bottom, stuff that will get soggy or crushed goes on the top.


Enchilada meat sauce with diced cheese on top and 3 folded tortillas in a ziplock bag.
Spaghetti meat sauce on the bottom noodles on the top.  (I would have preferred to have more meat sauce on the bottom but we ate more than I'd thought during dinner! hehe.)  If I had bread or rolls I would have made garlic bread and stuck it on top in a ziplock.  

Shepherd's Pie - I put a slice of cheese on the top to melt when he heats it. 

So like I said, these are an experiment for us, and I have no way of knowing yet if they worked or not - but I will be sure to give everyone my husband's review of them at the end of the day.  (Including whether or not it warmed quickly or if he spent half his lunch stirring and dumping out on plates.)

Have you ever done Pint Jar Meals?  These seem like a great idea for the working adult, or for a single adult.  I've heard they freeze well too, we have a pint jar in the freezer now with Scott's "famous" chili.  If it works then I'll let you know!  Feel free to let me know what works for you in the comments below!

Thursday, March 29, 2012

Bountiful Baskets - Eating Well on a Budget

So I originally posted a blog about Bountiful Baskets shortly after getting our own in December. For those of you who don't know what in the world I'm talking about go to Raising The Ruth's Blog for an easy how to.  And Bountiful Baskets to order. :)

My husband and I were both unemployed, him for 9 months, and me since I became a stay at home mom in summer of '08 until I became an indie author.  It was because of this trying time that I made a goal of feeding our family of 3 for $250 a month... its very trying, it requires a lot of focus, and in truth as close as we've come a few times we've not hit it yet this year!  But one of the best steps we have taken has been with Bountiful Baskets.

A Bountiful Basket is roughly 30 lbs of fresh produce for $16.50 (a little more for your first basket), and they're available through a large portion of the country.  The catch is that you don't know beforehand what fruits and veggies you get.  But the one basket tends to last us for two full weeks, meaning we spend $8.25 on 15 lbs of healthy fruits and veggies a week for three of us.  At least half of what we were paying before.

I have been impressed with their quality, the flavor of their veggies is great, and the variety is fun too, every once in a while we'll get something we don't like (or don't know we like!) but we have discovered we enjoy a few more mellons than we've ever tried, and I even like brussel sprouts!  For those things we don't love we either gift them to my mother-in-law (who is a huge fresh veggie eater) or we trade or toss them (I hate wasting food, but it isn't much)

Wednesday, March 28, 2012

Picture Frame Project - 6 frames for Under $10!

My Completed Frame
Ok, so the actual costs unfortunately will vary, but I spent $4.88 at Lowes on black "metal" spray paint and $2.76 on painters tape and used 6 frames that I had or was gifted.  I did six frames, two 8x10s and four 4x6s, and still have at least half of a can of spray paint and most of the roll of painters tape.  If you don't have any portion of the frame you want to keep in its "original" state you won't need the painters tape.  Check the $1 Store, garage sales, and Goodwill for old frames too.  Remember you're only looking for the structure of frame.


The Original Frame
Using painters tape and taking your time, cover any part of the frame you want to keep in its original state.  The key to getting a crisp sharp line is PRESSURE.  Rub the painters tape with an eraser or firm pressure of your finger to ensure its snug, if you need to make a corner-overlap the bit and rub it down too.

Fully and Carefully Taped Frame
Once finished taping (by far the longest part of the redesign) I took the frames outside and set them on a big old cardboard box.  You might want to secure them with a little tape onto the cardboard box, I bumped my box once and sent them all skittering about a few inches, made me nervous!
Set Up Your Work Area 

Make sure there is enough space between each frame to get to (notice how the bottom on the right are close together?  I had to bump that one to get to those two sides, don't risk a finger print!)
First Coat

When you are applying the spray paint don't soak it, read and follow the instructions (shake a full minute before spraying then spray 8-10 inches above the frame and left to right, release and shake the can, right to left, release and shake.)  I ended up applying 3 coats taking a 5-10 minute break between each coat and I think they look perfect.
The Second Coat (I hadn't left enough room and had to bump my frames around!)

I noticed as soon as my first coat was finished that the frames were too close together, and the slightest bump sent the lighter frames shifting.  So do remember to secure them and leave yourself space!

Completely Dry
Be sure to wait until they are fully dry.  My spray paint was done in 40 minutes, but I gave it the full hour the can requested.  Don't peel the tape off beforehand or you'll risk fingerprints or drips!  You should have a nice clean line if you took your time with the tape.

Peel The Tape Off
Completed Picture Frame

The "Used" Bread Store


When I was little I remember going with my grandpa about one morning a month to the bakery and filling up the trunk with bread to put in the freezer. I always thought it odd, but now I make my monthly trip to what my husband calls the "used" bread store. Its called a Bimbo Bakery Outlet, and I can get the good bread (the stuff you get from the grocery store for $3-5, 9-grain, Russian Rye, Dill Rye) for $1.25.

Bimbo Bakeries Outlet Stores
If you live in the Denver area, there is one by I-225 and Mississippi, in the same shopping center as JoAnn Fabrics.  If you don't go to Bimbo Bakeries Website and enter your zip code to see if there is one by you!

The Outlet is always hopping, people practically tripping over each other to grab good loaves, but their specials  tend to be around half price.  Plus they have punch cards and double punch card days that offer you additional discounts.  If you spend $8 at one time too they'll give you an extra loaf of bread for free.  We stock up our freezer about once every two - three weeks with Orowheat whole wheats, ryes, and bagels.  Sometimes we get english muffins or cookies (they always have them on their shelves, but sometimes their deals are too good to pass up!)  

Its been really great to have the breads we fell in love with when not stressing over our pocket book, and are nutritionally great for you for the price of discount breads.  On a budget anything for cheaper is better.  :) 

Originally posted on my letiamichelle.wordpress.com site